"The wise man should consider that health is the greatest of human blessings. Let food be your medicine."
- Hippocrates

July 5, 2012

Chili-Rubbed Sweet Potato Rounds with Guacamole


Three reasons why I LOVE this recipe:
  1. It's packed with nutrition (sweet potatoes are chock full of beta-carotene and vitamin C and avocados have anti-inflammatory properties, are full of fiber, vitamin A, C and folate).
  2. It's ridiculously easy - you don't even have to peel the potatoes!
  3. Best of all, it's incredibly tasty!! Spicy roasted sweet potato rounds topped with some creamy guacamole...it's like nachos without the less-than-healthy chips! Total comfort food!
You can serve these as a fun appetizer or a full meal, paired with a nice salad for example. We've always got both avocados and sweet potatoes lying around in our kitchen so this is a regular weeknight meal that's great when you're short on time but don't want to eat another bowl of cereal or toast with peanut butter (yeah, it happens!).

I found this recipe on the another great blog called Choosing Raw - I highly recommend you check it out if you're looking for some new plant-based recipes that are interesting and nutritious.

Chili-Rubbed Sweet Potato Rounds with Guacamole

Serves 4

For the chili spice rub:
2 tbsps chili powder
1 tsp paprika (I use regular here, but use smoked paprika if you want a smoky flavor!)
1 tsp coriander
1/2 tsp cinnamon
1/2 tsp sea salt
Dash cayenne pepper (omit if you don’t want the heat)

For the Potatoes:
1 large sweet potato, sliced into 1/4 inch rounds
Canola oil
1 recipe guacamole

Directions
Pre-heat oven to 425 degrees.
Mix spices together for the rub.
Brush or spray potatoes lightly with oil. Sprinkle them with the spice rub, mix well. Roast round for about 12-15 minutes, or until golden on the bottoms. Flip and roast for another 12-15 minutes.
Whip up a batch of classic guacamole.
Serve roasted rounds topped with a dollop of guacamole!

May 18, 2012

Sloppy Joes


I remember when I was a kid, one of my favourite meals was Sloppy Joes. They were basically spaghetti sauce with ground beef added until it was thick enough to stay put on the bun. Oh my, I loved this meal! This version is much healthier and let's just say, a bit more refined. It combines earthy lentils with the delicate crunch of walnuts. It's got a tomato base, but not overly so, allowing the rest of the flavours to shine!

This recipe is from one of my favourite cookbooks, the Get Healthy, Go Vegan Cookbook from Dr. Neal Barnard, he's the founder and president of the Physicians Committee for Responsible Medicine. The original recipe was for stuffed cabbage (which are also amazing), but I had some leftover filling one day and decided to serve it on a whole grain bun and call it a Sloppy Joe! I've since made a few adjustments to the original recipe to better fit my memory of what this classic sandwich tasted like. And just like my memories, this sandwich is a little messy, so have napkins nearby!

We love these in our house and usually prepare a double batch whenever we make them...leftovers can be frozen in individual servings and thawed for a quick and satisfying lunch or dinner!

Ingredients
1 onion, chopped
1/4 cup vegetable broth or vegetable oil for frying
4 garlic cloves, minced
1/2 teaspoon cumin seeds
1/2 teaspoon black pepper
1 teaspoon ground coriander
1 can tomato paste (more if you like your sandwiches more tomato-y)
2 cups water
1/2 cup crushed walnuts
1/2 cup dried brown lentils
1/2 cup long-grain brown rice (e.g. brown basmati)
3/4 teaspoon salt whole grain burger buns

Directions
1. Over medium heat, saute onion in with oil or broth until they brown. Add the garlic, cumin, black pepper, and coriander then saute for two minutes. Next, add tomato paste and saute for three minutes while stirring. Mix in two cups of water and bring to a boil.

2. Add in walnuts, lentils, and the rice. Cover until water boils again and reduce the heat to low. Cook for thirty minutes or so until lentils and rice are tender. Depending on how you like your Sloppy Joe consistency, you may need to add a bit more water near the end of cooking time to thin it out a bit.

3. Spoon mix onto whole grain buns (toasted is a nice touch). Enjoy!

April 1, 2012

Banana Soft Serve


What if I told you that you could make your own ice cream right now with only one ingredient...frozen banana? You'd think I was a little nuts...or at least forgotten what real ice cream actually tastes like! And you might be right; but I do know this stuff is AMAZING! I'd seen this technique all over the blogs for a while and I'm not sure why it took me so long to try it at home, but when I finally made it I was truely blown away! This stuff tastes and lookes just like soft serve ice cream! And it's so easy to make it's almost criminal...

I've provided a few extra pictures to give you some context for what to expect when you try this at home.

First, as seen below, peel two frozen bananas and chop them into approximately 1 inch chuncks; then throw them into your food processor.

(Note: I think a food processor is probably key for this recipe, if you're trying with a blender, I'd suggest cutting the banana into smaller chunks to start...that may help.)


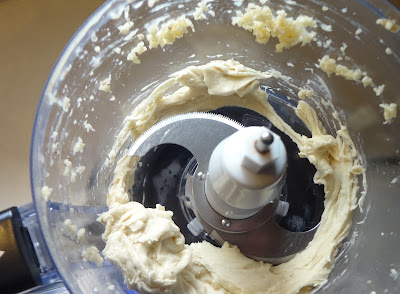
Next, blend the banana for 2-3 minutes until you see it getting nice and creamy, like below. Scrape down the bowl to incorporate any escaped banana chunks.


This is where it gets fun, at this point, add any flavours or additions you'd like to personalize your ice cream. My favorite is a touch of salt and about 1 1/2 tablespoons of cocoa powder (as pictured above). You could also add other frozen fruit or just plain vanilla. Continue blending for another 1-3 minutes until it reaches a desired consistency. Sometimes at the end I like to drop in a big spoonful of creamy peanut butter and just pulse it through until it's just barely incorporated...Oh my! Heaven!

Just keep in mind that the more ripe that banana, the sweeter the ice cream - so save those really spotty and soft fellas for a special (and very guilt free) treat!

Enjoy!

March 29, 2012

Broccoli-Almond Pesto with Rice Noodles


Phew! It's been a busy few months...resulting in a severe lack of posts! My apologies. The good news is that I've got a good number of recipes ready and waiting to be shared with you in the coming weeks - Yay!

So, back to it...it's spring again, and that means time to clean up our diet a bit. By way of another blog I frequent, I found a great New Year's cleanse hosted by Whole Living Magazine. It's called the Whole Living Action Plan 2012. It's a three week diet cleanse that has you omitting everything except fruits, vegetables, nuts/seeds, beans/legumes/tofu (in week 2), and gluten-free grains (in week 3). For non-vegetarians, the diet also permits the addition of seafood and eggs in weeks 2 and 3 respectively. It sounded challenging in the beginning, but after the first few days we got the hang of it and really enjoyed starting the day with a big smoothie and eating a new variety of vegetables and fruits throughout the day. We all get in our ruts where we find ourselves eating the same things week after week; this was a fantastic kickstart to get back to eating new and varied whole food meals!

We're currently rounding out our third week and feeling fantastic. I've gained energy and lost some weight (yay!). I highly recommend it for anyone feeling the effects of the long winter (both in health and pant size!). Today, I'm sharing one of my favorite recipes from the Action Plan so far...it's a Week 3 recipe but it was soooo worth the wait!! It combines almonds, basil and broccoli to create an incredibly vibrant pesto...one that I would happily use in place of any other based on a standard recipe. Trust me when I say you'd never know there's broccoli in there! Because the diet is exclusively gluten free, it calls for use of rice noodles; however, use any noodles you'd like based on your own preferences.

Rice Noodles with Broccoli-Almond Pesto

Ingredients

1 head broccoli, florets and sliced stems
6 tablespoons raw almonds
1/4 cup fresh basil leaves
1 clove garlic, roughly chopped
2 tablespoons lemon juice
5 tablespoons olive oil
1/4 tsp salt
pepper to taste
8 ounces rice noodles
Sliced almonds (optional)

Directions
1. Steam broccoli florets and stems until bright green and just tender, about 3-4 minutes. Rinse in cold water to stop cooking process and set aside. Roughly chop 1 cup cooked florets; set aside.

2. In a food processor, puree almonds until they resemble a course meal. Add remaining ingredients (except noodles) and puree until smooth. Set aside.

3. Cook rice noodles according to package instructions. Reserve 1 cup cooking water, drain noodles, and return to pot. Toss with pesto, adding reserved pasta water until creamy. Top each bowl with chopped florets, small basil leaves, and sliced almonds.

Enjoy!

This recipe was adapted from Whole Living Magazine's Whole Living Action Plan 2012

December 13, 2011

Roasted Squash and Macaroni Casserole


Every summer our family is lucky enough to benefit from my in-laws' plentiful garden. Almost every visit from them in the late summer weeks includes handfuls of fresh produce like garlic, onions and tomatoes! But what we all look forward to the most is their late Fall offerings of Hubbard Squash! If you haven't tried this type of squash you're missing out! It's so smooth and creamy and you'd swear it's drenched in butter...but it's not!

Anyway, I wanted to do something different with them this year, rather than eating them mashed or in a soup like we usually do. I found this recipe on one of my favorite Iphone apps - the Whole Foods Recipe app (you can access this service online as well here). You tell them what you have on hand and they find a recipe for you! This one looked so good I had to try it...and it was such a hit that I've made it several times since.

The recipe calls for butternut squash, but I used my Hubbard. I just roasted the whole thing and scooped out the cooked squash as needed. You could also used can pumpkin here too (be careful not to pick up the pie filling). I also added a bit of frozen chopped kale for some extra nutrition...I imagine any greens would work, or even chopped broccoli or peas.

The final product is creamy and filling, and the walnuts add a really wonderful delicate crunch. This recipe is the perfect comfort food and a fantastic substitute for traditional mac and cheese. It would be welcomed at any potluck and therefore great for the holiday season as well!

Ingredients
2 tablespoons olive oil
1 large yellow onion, thinly sliced
1 squash, peeled, seeded and cut into 1-inch pieces (about 2 pounds or 3.5-4 cups mashed)
1 (15-ounce) can coconut milk (light or regular)
3/4 tsp salt
Black pepper to taste
1/2 tsp dried sage
3/4 pound dried elbow macaroni, Penne or other small pasta (454g box minus about a handful)
1/2 cup chopped toasted walnuts
1-2 handfuls frozen chopped kale (or other greens) (optional)
1/2 cup whole wheat bread crumbs

Method
To roast the squash, preheat oven to 400°F. Roast diced squash for 25-40 minutes until fork tender. If you're roasting a whole squash cut in half you'll have to roast it for at least an hour...timing depends on how large and thick your squash is. Once cooked, mash roasted squash, leaving some chunks.

Preheat oven to 350°F. Lightly oil a 9x13-inch casserole dish; set aside.

Heat oil in a medium pot over medium heat. Add onions and cook, stirring often, until softened, 5 to 7 minutes. Add roasted squash, coconut milk, salt and pepper and simmer for 10 minutes. Stir in sage and kale and simmer 5 minute more. (This part can be made ahead, up to 1 day in advance.)

Meanwhile, bring a large pot of salted water to a boil. Add macaroni and cook until tender but still firm, about 8 minutes. Rinse in cold water, drain well and transfer to a large bowl. Transfer squash mixture to bowl with macaroni. Add walnuts, salt and pepper and toss to combine. Transfer to prepared dish and top with bread crumbs. Bake until just golden brown and hot throughout, about 30 minutes.

Enjoy!

This recipe is from Whole Foods Recipe index at http://www.wholefoodsmarket.com/recipes

November 8, 2011

Spiced Squash and Toasted Almond Quinoa


Having been on maternity leave for the last 13 months, I'll admit that I've watched my fair share of daytime television. But for all you haters out there, I'd like to point out that you can learn some really interesting and valuable things on some of these shows! For example, did you know that Anderson Cooper rarely eats anything other than boiled hotdogs? Or that you can incorporate your leftover Halloween pumpkins into your at-home workouts? Ok, so not everything is ground breaking! But it passes the time and if you're lucky you come away with a piece of information that is actually useful in everyday life. This recipe is a great example of that!

Aida Mollenkamp is a Food Network chef that was featured on daytime's Access Hollywood Live about a year ago. She prepared this recipe and it looked so good that I immediately looked it up online so I could make it that night! It was fantastic! I did make a couple minor adjustments in the preparation as well as by adding black beans...making it a nice hearty complete meal.

If you've never heard or tried quinoa in your kitchen, I highly recommend it! it's as simple as cooking rice and is truly a super food! It has a nice fluffy texture with a slightly nutty flavour. It comes in red or tan...I used the red quinoa in the picture but the color doesn't make any difference in the taste. Quinoa is high in protein, fiber, magnesium, iron, copper and phosphorus, making it especially valuable for persons suffering from migraine headaches, diabetes and cardiovascular problems (source).

Spiced Squash and Toasted Almond Quinoa

Ingredients
2 tablespoons olive oil
3 cups small-diced butternut squash
2 teaspoons ground cumin, coriander, and paprika
1.5 cups quinoa, rinsed and drained
2 teaspoons salt, plus additional for seasoning
3 cups vegetable broth or water
2 teaspoons freshly squeezed lemon juice
1 teaspoon packed lemon zest
1 can black beans, drained and rinsed
3 thinly sliced medium scallions
1/2 cup slivered almonds

Directions
Heat oven to 425 degrees. Spread diced squash on a cookie sheet, drizzle with olive oil and cook for approximately 30 minutes (flipping once) or until fork tender but not too mushy.

Meanwhile, rinse quinoa and drain. Heat a medium pot over medium heat, add quinoa, and stir frequently until moisture evaporates and it makes a popping noise, 5-10 minutes. Add broth and 2 tsp of the salt, stir briefly and return to a boil. Cover, reduce heat to low, and simmer until quinoa absorbs liquid and grains are tender, about 10 to 15 minutes.

Stir in roasted squash, black beans, lemon juice, zest, and scallions and season to taste with salt and freshly ground black pepper. Heat on low-medium heat until heated through. Sprinkle almonds over the top and serve.

Enjoy!

You can find this recipe on Aida Mollenkamp's blog Pairs Well with Food.

October 5, 2011

Pumpkin Pie with Pecan Crust


There's something about Fall weather that just makes me crave pumpkin... And with Thanksgiving coming next weekend there's really no better reason for breaking out a yummy pumpkin pie recipe! I found this one online a few years back and therefore can't credit the author, but if I could, I'd tell them that this recipe is one of my favorites of the season!

The recipe itself is very quick and easy to make. I especially like the pecan crust as I haven't had luck with traditional crusts in the past so I tend to avoid them. I've made it a few times now and each time the pie sets really nicely, making a thick and smooth texture. Because the pie is only sweetened with a half cup of maple syrup, it's not too sweet, allowing the flavour of the pumpkin and other seasonal spices shine!!

I hope everyone has a wonderful Thanksgiving weekend with your friends and family...and don't forget good food too!!


Ingredients

Pecan Crust
3/4 cup pecan halves
3/4 cup rolled oats
3/4 cup whole wheat pastry flour
1/2 teaspoon ground cinnamon
1 pinch salt
1/4 cup vegetable oil
3 tablespoons real maple syrup

Pie Filling
1 cup soy milk (or other non-dairy milk)
1/4 cup arrowroot powder or cornstarch
1 (15 ounce) can pumpkin puree (not pumpkin pie filling)
1/2 cup real maple syrup
1/2 - 1 tablespoon grated fresh ginger (add to your taste)
1 1/2 teaspoons ground cinnamon
1/2 teaspoon salt
1/4 teaspoon freshly grated nutmeg
1/8 teaspoon ground cloves

Directions

Set rack in the middle of the oven, and preheat oven to 375 degrees F (190 degrees C). Lightly oil a 9 inch pie plate. Set aside.

Spread nuts over a baking pan. Toast for 7 to 10 minutes, or until the smell of nuts fills the kitchen. Set aside 16 pecan halves for garnish.

Combine oats, flour, remaining pecans, cinnamon, and a pinch of salt in a food processor bowl. Pulse until mixture becomes a coarse meal. Transfer to a mixing bowl. Whisk together oil and maple syrup and mix into dry ingredients to form a soft dough. Press mixture into prepared pie plate. Crimp edges. Bake for 10 minutes, and set aside to cool.

Blend soymilk and arrowroot/cornstarch in the food processor until the arrowroot is completely dissolved and the mixture is smooth, about 15 seconds. Add pumpkin, maple syrup, ginger, cinnamon, salt, nutmeg, and cloves; process until thoroughly blended. Pour filling into baked crust, and smooth the top with a spatula.

Bake for about 35-40 minutes, or until the crust is lightly browned and the outside inch of the filling is set. Don't worry if the center is still soft; it firms up as the pie cools. Transfer pie to a wire the rack. Gently press toasted pecan halves into hot filling in 2 concentric circles. Cool to room temperature, and then chill until set, at least 3 hours to overnight. Serve chilled or at room temperature.

Enjoy!

August 9, 2011

Portobello Mushroom Burgers


I've been eating veggie burgers and veggie dogs for a long time now...and I love them...especially during barbeque season. But, it's nice to have an alternative to these guys when you get a hankering for a thick and juicy (meat-free) burger! Actually, I'll admit that after trying these earlier this year, I haven't had a soy veggie burger all summer!

These burgers are surprisingly meaty considering they're a simple fungus! They're not bad on the wallet either! Try to find the biggest caps you can as they shrink a bit in cooking...I found HUGE ones at Costco for a great price!

The vinaigrette recipe is super simple and just a guide...I usually just pour a couple glugs of oil and balsamic vinegar until I have enough to coat the caps. They always turn out perfect!

I like to top mine with fresh lettuce, tomatoes, and diced avocado. But feel free to top with whatever your heart desires (e.g., Dijon mustard, vegan mayo, pesto, grilled or caramelized onion, chutney, hummus, bbq sauce, etc...). Pair them with grilled veggies, a nice bean salad, greens, or my favorite, sweet potato fries!! So summery!!

Grilled Portobello Mushroom Burgers

Ingredients

2 large portobello mushrooms
1/2 red or yellow onion, finely diced
1-2 cloves garlic, diced (optional)
1/4 cup olive oil
3 tbsp balsamic vinegar
pinch salt and pepper

Directions

Carefully pull or cut stem from mushrooms and brush clean. Place mushroom caps gull side up on a large plate.
Mix all other ingredients together and pour evenly over mushrooms. Let caps marinade for at least 30 min to a couple hours.
Cook mushrooms on hot grill for about 5 minutes per side (depending on thickness).
Serve on a toasted whole grain kaiser roll, or bun of your choice.

Enjoy!


July 13, 2011

Maple Banana Loaf


FRUIT FLIES!! Arg!! Is anyone else dealing with this mid-summer pest? Over the past few days they've declared war over our kitchen and so far, they're winning! Isn't it amazing how fast they reproduce?! I mean seriously!! I realized quickly that the super-ripe bananas sitting in the fruit bowl was not helping our cause. Hmmm, alright, if I have to...I'll make banana bread...twist my rubber arm!

This loaf is my go-to recipe for banana bread. It's a Dreena Burton recipe, and as always, it's low in sweetener, uses whole grain flour, and turns out perfectly moist and delicious every time! The bread is spiced just right and is complemented so nicely with the sweetness from the maple syrup and banana. Oh, and you may have noticed the little bits of chocolate in the picture...yeah, chocolate and bananas are a match made in heaven if you ask me! Also try adding nuts like pecans or walnuts, they all work really well with this recipe.

Sliced bread freezes really nicely, as do muffins*...they're great to have on hand in the freezer when you want a nice treat.

Now you too have a strategy to conquer the fruit flies in your kitchen! You're welcome! ;)

Maple Banana Loaf

Ingredients
1 3/4 cup whole wheat pastry flour
2 tsp baking powder
1/2 tsp baking soda
1 tsp cinnamon
1/2 tsp fresh nutmeg, grated (or ground nutmeg)
couple pinches of salt
1/4 cup chocolate chips and/or nuts of your choice (optional)
1 cup very ripe bananas, mashed (usually about 2-4 bananas)
1/2 cup pure maple syrup
1/2 cup + 2 tbsp vanilla or plain non-dairy milk
1 tsp vanilla extract
1 tbsp canola oil

Directions
Preheat oven to 350 degrees. In a large bowl, combine dry ingredients (including chocolate chips and nuts), sifting in baking powder and baking soda. Mix well. In a separate bowl, combine mashed banana with maple syrup, soy milk, vanilla extract and oil. Mix until just combined (do not overmix).

Pour into a lightly oiled 9"x5" loaf pan and bake for 45-50 minutes, until golden brown and a toothpick inserted in the center comes out clean.

*For muffins, bake at 375 degrees for 19-23 minutes until golden brown and a toothpick comes out clean.

Enjoy!

This recipe is from Dreena Burton's The Everyday Vegan

June 23, 2011

Falafel Sandwich


Back in university, before I decided to go vegetarian, every Saturday morning we'd all head over to the farmer's market in Fredericton and nosh on local yummies like sausages and chicken wraps. After going veg, I had to find a replacement for these sacred rituals...enter, Falafels. Yes, I know, if you've never heard of them before the name could sound scary or intimidating, but don't fear...they are simply ground chickpeas with some mild seasonings, formed into balls and fried or baked. It's a common dish in the Middle East and is usually eaten wrapped in a pita with various dressings.

I've only recently tried to make these at home, but am now kicking myself for not trying sooner! They are ridiculously easy to make, and are perfect for lunches. You can even eat them on the go with one hand if they're pre-wrapped...now that's awesome!

Falafel sandwiches are traditionally topped with lettuce, pickled vegetables, hot sauce, and drizzled with tahini-based sauces. I decided to top mine with romaine lettuce, hummus (click here for recipe), red onion, and sliced tomatoes...but feel free to mess around with your toppings. I haven't tried the sauce listed below, but I'm sure it's yummy! Let me know if you try it!

Ingredients
1 can (19oz) chickpeas, drained and rinsed
1 onion, diced
3 cloves garlic, minced
1/4 cup fresh parsley, chopped OR 1 tbsp dry parsley
2 tbsp tahini
1-1/2 to 2 tsp ground cumin
1 tsp ground coriander
1/2 tsp salt
1/8 tsp black pepper
1/4 tsp cayenne pepper
1 tsp lemon juice
1 tsp baking powder
1 cup bread crumbs (I used whole wheat)

For falafel sauce:
1 container (6-oz) plain nondairy yogurt
1-2 tbsp tahini (I used 1-1/2)
1/2 cucumber, peeled and finely chopped
1 tsp dried dill

Optional ingredients:
hamburger buns or rolls, pita bread, tomato slices, lettuce

Directions
To prepare the sauce, combine all of the sauce ingredients in a small bowl and chill for 30 minutes.

For the falafels, preheat the oven to 400.

Pulse the chickpeas, garlic and onions in the food processor until thick and pasty, but still a little chunky; transfer to a medium-sized bowl. Stir in parsley, tahini, cumin, corriander, salt, pepper, cayenne pepper, lemon juice, and baking powder. Slowly add the bread crumbs, until the mixture holds together well (I only needed 1/2 cup, but it will depend on the moisture of your other ingredients).

Shape into patties or balls (about 1/4 to 1/3 cup each) and place on a nonstick baking sheet. Bake for 10-12 minutes until golden brown on the bottom. Flip over and bake for another 10-12 minutes.

Serve alone with sauce on the side, on a bun, or in a pita wrap.

If serving in a wrap, put the lettuce down first to shield the bread from getting soggy, then spread hummus or falafel sauce, followed by thinly sliced red onion, tomato and 2-3 falafels slightly crushed (depending on the size or your pita). Roll the pita tightly and wrap it all in plastic or aluminum foil. We use this method when preparing lunches in the evening and the sandwiches still taste perfectly fresh the next day!

I haven't tried it yet, but I'm sure they'd even be good crushed up on a salad!

Enjoy!

This recipe is from Colleen Patrick-Goudreau's The Vegan Table

June 6, 2011

Steel Cut Oatmeal, Two Ways

There's nothing like a warm bowl of oatmeal to greet you in the morning! Growing up, I loved the little bags of instant oatmeal that came pre-flavoured with maple and brown sugar. I'd go through phases where I liked my oatmeal thick and lumpy, almost dry; and others where I'd eat it almost like soup, sloppy and full of milk. Those bags of instant oatmeal are at one end of the "oatmeal spectrum" while at the other end, you'll find steel cut oats. Steel cut oats go through very little processing compared to the quick oats you find in the instant oatmeal packages. When cooked, they are naturally creamy and chewy, an absolutely scrumptious way to start your day! They really fill you up and keep you going until lunch too!

The only downside I've found to cooking steel cut oats is the cooking time...they take about 30 minutes to cook on the stove-top; and cooking in the microwave can be tricky as they tend to boil over and make a big mess. I've found two no-fuss ways to enjoy this grain that I know you'll love; one is super fast, the other, super slow...both are very easy and low maintenance though!

I like to top my oatmeal with some non-dairy milk, crushed walnuts and real maple syrup...also try fresh or frozen berries, any nuts, raisins, coconut, brown sugar, etc...

Super Slow Steel Cut Oats (in the slow cooker)
Serves 4
Cooking your oats in a slow cooker overnight is a great way to enjoy warm and creamy oatmeal first thing in the morning! Just turn on the cooker right before bedtime, and in the morning you'll have the sweet smell of cinnamon calling you from the kitchen; just scoop, add toppings, and enjoy! So easy!

Ingredients
1 cup steel cut oats
4 cups water
1/4 cup non-dairy milk, or more water
pinch salt
pinch cinnamon or nutmeg (or both)

Directions
Spray slow cooker with non-stick spray. Add all ingredients and turn slow cooker on low before bed...at breakfast, enjoy!


Super Quick Steel Cut Oats
Serves 1
These oats are blended to a flour-like consistency, so they cook really quickly (about 5 minutes)! The result is a smooth, almost cream-of-wheat type consistency. I like to blend a few cups worth and store the flour in an airtight container for a quick breakfast in the morning! Note: the recipe below is for one serving, just remember it's a 1/4 cup oat flour to 1 cup water, so you can make as many servings as you like!

Ingredients
1/4 cup pre-blended steel cut oats
1 cup water
2 tbsp - 1/4 cup non-dairy milk, or more water
pinch salt
pinch cinnamon or nutmeg (or both

Directions
In a blender, blend a few cups of steel cut oats until they reach a grainy flour-like consistency. Store extra flour in an airtight container.

In a saucepan, combine 1/4 cup oats, 1 cup water, salt, and cinnamon over medium heat. Whisk almost continuously, while mixture starts to come to a low boil. Reduce heat to medium-low as it is thickening and starting to bubble. Once thickened, whisk in a couple tablespoons to 1/4 cup non-dairy milk - until it reaches your desired consistency.

Serve oatmeal immediately, topping with another drizzle of non-dairy milk (as oatmeal will thicken more as it sits).


As a final note, here are some of the many health benefits to adding oatmeal to your diet:

Soluble Fiber: One of the best benefits of oatmeal is that it lowers cholesterol by removing LDL (bad cholesterol) while maintaining HDL (good cholesterol)

Insoluble fiber: Absorbs water which helps to speed the transit of food through the bowels; helping reduce the risk of some bowel related cancers (i.e. colon cancer)

Beta Glucan: A bio-defense modifier which means it will boost your immune system

Vitamins and Minerals: Including Iron, Zinc, Selenium, and Vitamin E

Phytochemicals: Plant chemicals that have shown promise in fighting and preventing cancer. For example, the phytoestrogens (lignans) found in oats help to fight hormone related diseases like breast, ovarian, and prostate cancer.
Source

Happy breakfast!

May 6, 2011

B-raw-nies

Every Spring I get the urge to do a bit of a diet cleanse...meaning for three weeks I tighten up my diet by eating more veggies and completely avoiding all caffeine, alcohol, sugar and anything processed. This helps realign my diet after a long winter of maybe not the best eating habits...and it doesn't hurt with the upcoming tank top and bikini season either!!

Anyway, we started this cleanse last week and all was going great...until yesterday - it was my and my husband's fourth wedding anniversary! We wanted to have a special dinner at home while sticking to our cleanse. We decided to have one of our favorites, pasta dinner - but we still needed a dessert! I remembered a recipe I had recently seen on my favorite vegan chef, Dreena Burton's blog, that met the criteria... Hallelujah, it was a hit, a big hit!

This brownie recipe is brilliant! It's completely raw, has no flour, sugar or added oils, and is very easy! Believe me people, I know my chocolate brownies, I consider myself an expert in this area...and these can compete with your best cooked version any day of the week! They are moist, nutty, and super chocolatey! And the icing has the slightest hint of coconut that pairs so perfectly with the brownie base. Now, for those of you on a real diet, keep in mind, these are not calorie free...not even close...but they are a completely whole food, raw, gluten free and healthy alternative. I highly recommend trying them!!!

Brownie base:
1 cup raw almonds (see note)
1/4 cup raw cashews
1/2 cup raw walnuts
1 3/4 cups (packed) pitted medjool dates (see note)
1/4 cup dried organic pitted cherries (OR more dates, i.e. can use 2 cups dates in whole - omit almond extract if not using cherries)
1/3 cup raw cocoa powder (or regular cocoa if you prefer)
1 vanilla bean (or regular vanilla extract, see note)
1/4 tsp sea salt
1/2 tsp almond extract (optional)

Frosting:
1/2 cup coconut butter (not coconut oil; I used Artisana coconut butter found at my local health food store or Farmboy)
1/4 cup agave nectar
2 tbsp raw cocoa powder (or regular if you prefer)
pinch sea salt

Directions:
In a food processor, first add almonds and cashews and process until very fine (the almonds are the hardest, and need to be worked until crumbly). Then add walnuts, dates and cherries and pulse/process until mixture is quite crumbly, but not yet coming together. Then, add cocoa powder, salt, and almond extract, and pulse through.

If using vanilla bean - with a sharp tip knife, slice the vanilla bean down the outer side to open up the bean. Using a blunt (butter) knife, scrape out all the tiny seeds from the bean on both sides, and add them to the processor (or add vanilla extract). Process again, along with the almond extract if using.

Process until the mixture starts to come together but do not overmix so that the nuts release their oils (see note). Then remove the mixture and press into a brownie pan (8” x 8”) lined with parchment paper. Use a small piece of the parchment to help press and flatten the mixture evenly into the pan.

For the frosting, in a mini-food processor, first combine the coconut butter and agave nectar until smooth. Then add the cocoa powder and salt, and pulse through again until just combined. Do not overprocess or the frosting will begin to separate with the heat of the churning and become oily. (If you don’t have a mini-processor, you can follow the same steps stirring by hand in a bowl). Smooth frosting over base, and refrigerate for an hour or more until set.

Cut into squares and serve! You can also freeze the squares after cutting, and enjoy them out of the freezer!

(Note: A combination of ¾ cup almonds and ½ cup cashews also works well.)

(Note: You can substitute 1 – 1 ½ tsp of pure vanilla extract for the vanilla bean seeds.)

(Note: If your dates are on the dry side, you can add 1-2 tbsp of water to the mixture to help assist the pureeing and the mixture easily coming together.)

(Note: If you process the mixture too long, the heat generated by the food processor will bring the oils out of the nuts. If this happens, the brownies won’t be ruined necessarily, but they will have an oily appearance and be oily to the touch. So, process minimally to begin, rather than over processing the nuts at the outset.)

I got this recipe from Dreena Burton's blog, Eat, Drink and be Vegan. It's such a great resource, so I highly recommend you check it out.

April 9, 2011

African Sweet Potato and Peanut Stew


This dish is one of those ones that you'll have to pack away the leftovers right away, or else you'll find yourself coming back to the pot over and over again to sneak "one more spoonful" until you're left with pants that are too tight, and minimal leftovers for lunch the next day! I first tried this recipe when my super mother-in-law made it for us this Christmas...we've pretty much made it every other week since then!!

The secret ingredient is the peanut butter...it makes the stew so creamy and slightly sweet when it meets the tomato and sweet potatoes. The recipe calls for sweet potato and kidney beans, but I've made it with butternut squash and chickpeas (as pictured) and it turned out just as fantastic! We like to serve it over quinoa, but any grain will do! The recipe makes a good amount so you should have enough to freeze or serve the next day (if you heed my warning from above!).

Ingredients

3 tablespoons water or oil (for sauteing)
2 medium onions, chopped
3 garlic cloves, pressed or minced
2 red bell peppers, seeded and chopped into bite-sized pieces
1 tablespoon light brown sugar (I skip this, it isn't necessary)
1 teaspoon grated or minced fresh ginger
1 teaspoon ground cumin
1 teaspoon ground cinnamon
1/2 teaspoon cayenne pepper (a little generous if you like things on the spicy side)
1/2 cup smooth natural peanut butter (crunchy is fine too)
3 sweet potatoes peeled and cut into 1/2 inch cubes
1 can (15 oz.)red kidney beans, drained and rinsed
1 can (19 oz.) diced tomatoes or 2 fresh tomatoes, diced
4 cups vegetable stock
1 teaspoon salt (or to taste)
1/2 cup chopped, unsalted dry-roasted peanuts (optional)

Directions

Heat water or oil in a large saucepan over medium heat. Add onions and garlic and cook until softened, about 5 minutes. Add bell pepper, cover and cook until softened, about 5 minutes. Stir in brown sugar, ginger, cumin, cinnamon and cayenne pepper, and cook, stirring for 30 seconds.

Stir in peanut butter and tomatoes, stir until melted and distributing evenly.

Add stock, sweet potatoes and kidney beans. Bring to a boil, then reduce heat to low and simmer until the sweet potatoes are soft (30 – 40 minutes). Taste and add salt if necessary. Serve over your choice of grain with chopped peanuts on top!

Enjoy!

This recipe is from Colleen Patrick Goudreau's The Vegan Table

March 13, 2011

Coconut-Lime Chickpea Stew with Rice


I found this recipe in the Holiday issue of Food & Drink magazine...you know, the one you can pick up for free at the LCBO. After reading the title I was a little bummed as it was originally called Coconut-Lime Chicken Stew with Rice...booo! But after thinking for, oh, a nanosecond, I realized this stew would be fantastic with chickpeas instead! And so it was...sooo fantastic!

I made a few other changes to the recipe in addition to the chickpeas...here's the final product.

Ingredients

1 tbsp vegetable oil
3 cups onions, coarsely chopped
1 1/2 cups red pepper, diced
2 cloves garlic, minced
3 tbsp fresh ginger, minced
1/2 tsp red pepper flakes, or to taste
4 cups sweet potato, finely cubed
4 cups vegetable stock or water
1 can coconut milk (light or regular)
1 cup cooked basmati rice
1 can cooked chickpeas
1/2 cup frozen peas
1/2 cup frozen corn
1/2 cup fresh cilantro, coarsely chopped
Zest and juice of 2 limes
Salt and pepper to taste

Directions

In large pot, heat oil over medium heat, add onion, red pepper, garlic, ginger, and red pepper flakes - sauté until onions are translucent, about 5 minutes.

Add the sweet potato and stock, bring to a boil then lower heat and simmer until potatoes are tender.

Add remaining ingredients and simmer for another 5 minutes. Serve.

A note on freezing: This soup freezes really well, the only thing I'd recommend would be to let it thaw in the fridge overnight, then warm it up...rather than using the "defrost" function on your microwave. When reheating a soup with rice, you want to heat it as little as possible so as to avoid overcooked soggy mush. :D


Enjoy!

January 31, 2011

Easy Pleasin' Hemp-Oat Bars


As promised here's another recipe featuring hemp nuts. I'm always looking for a yummy snack to replace those boxed granola bars I used to eat so often. These wheat-free bars are perfect because they have the texture of chewy granola bars but aren't too sweet and have no processed or refined ingredients! Best of all, they freeze really well and you can make them in no time flat! They're great for lunches, go great with coffee, and are perfect if you need something to eat on the run!

I usually add chocolate chips, but for a healthier version you can add dried fruit and/or nuts instead...or don't add anything and just enjoy the simplicity of the oats and hemp on their own!! And if you don't have hemp nuts, no problem! The original recipe didn't call for them anyway...just use an extra half cup of ground oats.


Easy Pleasin' Hemp-Oat Bars
makes 10-14 bars

1 1/2 cups ground oats (see note)
1 cup quick oats
1/2 cup hemp nuts
1/4 tsp sea salt
1/4 tsp cinnamon
1/4 cup chocolate chips, dried fruit, or nuts or your choice
1/4 cup pure maple syrup
1/3 cup barley malt OR brown rice syrup OR honey
1/4 cup vanilla or plain soy milk or other non-dairy milk
1 1/2 - 2 tbsp organic canola oil

Directions

Preheat oven to 350°F (176°C).
In a large bowl, combine all the dry ingredients.
Add the wet ingredients into the dry mixture, stirring until well combined.
Transfer the mixture to a lightly oiled 8"x8" baking dish and press it down until evenly distributed.
Bake for 19 minutes, then remove and let cool in pan.
Once cool, use a sharp knife to cut the bars, then remove with a spatula.

Tip: The bars are softer if they are not overbaked. For even softer bars you can use a smaller pan to yield thicker bars.

Note: This recipe calls for “ground oats.” Ground oats can be made from quick oats, which are available in grocery stores. Use your food processor and process the quick oats for a minute or two. The consistency should be similar to coarse flour.

Enjoy!

This recipe is from Dreena Burton's Vive le Vegan

January 4, 2011

Quick and Easy Pumpkin Curry


I've been meaning to share this fantastic Pumpkin Curry recipe with you all for a while now...it's become a regular favorite in my house as of late. It features mild curry flavours including slightly spicy from the red chilies and ginger, and creamy sweetness from the coconut! Best of all, it's SUPER easy to make! I know, I know, I always say that...and yes, I always mean it! But this one is even easier than usual...the only chopping you'll have to do is the onion and garlic, the rest is measure, pour and stir!

I've made some minor adjustments to the recipe, mainly in the spicing. Feel free to play around with it depending on your tastes though. I like to serve it over some brown basmati rice, but it's just perfect on it's own too! Oh, and it freezes superbly...so make a big batch and save some for a rainy (or snowy) day!

Pumpkin Curry
3 tbsp vegetable oil
2 medium-size yellow onions, finely chopped
1 tsp grated fresh ginger
3 garlic cloves, minced
1 1/2 cups red lentils
3 cups water or vegetable stock
3 tbsp curry powder
1/4 tsp cayenne OR 1/2 tsp chili powder
1/2 tsp dried red chili flakes
1/2 tsp salt
2 cups nondairy milk OR 1 can coconut milk
1 large (796 ml) can of pumpkin puree (not the pumpkin pie filling!)
1/2 cup shredded coconut (optional)

Directions
Saute onion, garlic, ginger until onions are translucent (about 6 min).
Add lentils, water, curry powder, cayenne, chili flakes and salt. Bring to a boil, then reduce heat to medium-low and cook until lentils are almost cooked al dente (soft but still retains body and texture) (about 15-20 minutes).
Stir in milk, pumpkin puree and shredded coconut. Stir well and heat through on medium heat.
Serve over rice or other grain if desired.

Enjoy!!

This recipe is adapted from
Colleen Patrick-Goudreau's Vegan Table.

November 22, 2010

Who wants Brownies?


If you're anything like me...brownies are one of those treats that are perfect for just about any occasion! My favorite way to eat them is slightly warmed up with a big scoop of ice cream on top (try this brand!).

These brownies are just the way I like them, slightly crispy on top and ooey gooey fudgy in the middle! They taste sinful, but really, compared to other recipes, they're not all that bad! I'm not saying you should eat them for breakfast of course, but everyone needs to indulge in a nice decadent treat every now and then. Are you with me?? Thought so!!

So go ahead, make these tonight...it's Monday, and nothing makes Mondays slightly more tolerable than a nice warm fudgy brownie! Here's the recipe!

Ingredients

3/4 cup all-purpose flour*
1/3 cup more all-purpose flour or whole wheat pastry flour*
1/3 cup cocoa powder
1 tsp baking powder
3/4 cup + 1 Tbsp unrefined sugar
1/3 cup ground chocolate chips (grind in a food processor)
1/2 tsp sea salt (a little generous)
1 Tbsp arrowroot powder OR cornstarch
1/4 cup + 2 Tbsp plain soy milk or other plain non-dairy milk
3 Tbsp pure maple syrup
1/3 cup canola oil
1 tsp pure vanilla extract

Directions

Preheat oven to 350 degrees.

In a bowl, sift together the flours, cocoa powder and baking powder. Add the sugar, chocolate chips, and salt, and stir until well combined.

In a separate bowl, combine the arrowroot with several tablespoons of the milk, stirring through until smooth, then add the remaining milk and other wet ingredients and stir until well combined.

Add the wet mixture to the dry, and stir through for about 1/2 minute or so (the batter will be quite thick). Pour evenly into a lightly oiled (or lined with parchment paper) 8x8 inch baking pan.

Bake for 23-25 minutes, then remove from oven and let cool in the pan, running a spatula around the outer edge to loosen. Once cooled, cut into squares.

Makes 12-16 brownies
* For wheat-free brownies, use white spelt flour, but add an extra 2-
3 Tbsp (in addition to the 3/4 cup + 1/3 cup)

Enjoy!
This recipe is from Dreena Burton's Vive le Vegan

November 4, 2010

Spicoli Burgers


These burgers are from the brilliant Dreena Burton's
Eat, Drink and be Vegan. Their name was inspired by the movie Fast Times at Ridgemont High (great movie if you haven't seen it!). Anyway, in it, the hilarious character Jeff Spicoli (played by Sean Penn) is a surfer dude who partakes in smoking lots of marijuana!! Since these burgers are packed with nutritious hemp seeds...well, I guess it seemed fitting :D

Hemp seeds are super nutritious! Here are a few facts about them:

Hemp was first cultivated in China more than 6,000 years ago, and was used as a food source long before soy foods

Hemp seed is considered by leading researchers to be one of the most nutritious super foods on the planet — packed with protein, vitamin E, Omega-3, and GLA

Hemp has twice the iron and magnesium contained in flax.

Hemp is a complete protein
Source


You can use hemp seeds in so many ways like adding them to cereal, omelets, yogurt, soups, snacks, smoothies, salads, pasta, veggies, dressings, and desserts. You can find them in your local health food store, or online...we buy ours from
Manitoba Harvest. I highly recommend picking some up to try. And no worries, if you do invest in hemp seeds, I'll be including several other recipes that use them here...so you won't be left with a big quantity and nothing else to do with them. Most online retailers publish recipes as well...so try doing a quick search!

These burgers are not only packed with protein and nutrition, they're really great tasting and super easy to make too! They're great to bring to work for lunch or to grab as a quick snack. You can throw them in a pita with veggies and eat it as a wrap or just eat them on their own. They freeze really well too, so you can make a big batch and have them on hand whenever you want (if they're around for that long!).

Spicoli Burgers
Yields 9 patties

Ingredients

Note: you'll need a total of 3 cups of cooked rice for this recipe
2 tsp olive oil
1 1/2 cups onion, diced
1/8 tsp salt
fresh ground pepper, to taste
3/4 cup red pepper, diced
2 cups cooked short grain rice
1 cup shelled hemp seeds
2 cloves garlic
2 tbsp ketchup
1 tbsp tamari
1 tsp Dijon mustard
1 tsp oregano
1/2 tsp thyme
1/4 tsp sage
1/4 tsp sea salt
1 cup cooked short grain rice
1/4 cup flour
2 tbsp olive oil

Directions

In a frying pan on medium heat, add oil, onions, salt and black pepper. Saute for 3-4 minutes until onions start to soften. Add bell pepper and saute for another 5-6 minutes, until onions are fully softened.

In a food processor, combine veggies, 2 cups rice, hemp seeds, garlic, ketchup, tamari, mustard, oregano, thyme, sage, and salt and puree until fairly smooth, scraping down the sides of the bowl if needed.

Transfer to a bowl and stir in remaining rice. Refrigerate for at least 30 minutes to firm up.

Remove from fridge and form patties with your hands. Place flour evenly on a plate and lightly dust both sides of each patty, shaking off access.

In a frying pan on medium-high, heat oil. Add patties 3 or 4 at a time and lightly flatten with a spatula. Cook 6-9 minutes on each side, until golden and a crust has formed.

Enjoy!

September 17, 2010

Roasted Yellow Pepper and Corn Bisque

With the crisp Fall temperatures coming at us these days, it's nice to have a comforting soup to come home to. This dish is perfect for the season, using fresh corn, yellow squash, and yellow peppers. Together, they make a beautiful yellow soup that is slightly sweet and very creamy! Due to the pepper roasting, this soup does take a bit more preparation than others, but it's so worth it! And if you're really keen, you can roast and prep the peppers the day before to save some time. Try roasting them on the barbecue, it gives you an excuse to spend some more time with the big guy before he's put away for the winter!

To pump up the nutrition with extra fiber and protein, I added red lentils. Red lentils are my favorite trick for adding nutrition and thickness to creamy soups because they break down so well once cooked - you really don't notice they're there!

You can choose to partially blend or fully blend this soup depending on your mood. I chose to blend about 2/3 of the soup and keep the rest unblended. This added a nice texture to the soup, especially the fresh corn because it's still a bit crisp!

This is officially my new favourite Fall soup...until I find my next fav anyway :) Give it a try!


Ingredients

4 yellow bell peppers
3 cups fresh corn, cut from the cobs (about 4 cobs)
1 tbsp vegetable oil
1 medium sized onion, diced
3 cloves garlic
1/2 tsp red pepper flakes
3 cups yellow summer squash, cut into small cubes
1 cup dry red lentils
4 1/2 cups vegetable stock
1 1/2 tsp salt
1 (14 oz) can of coconut milk (light is fine)
1 tbsp pure maple syrup
juice of 1 lime, or to taste
1/2 tsp ground nutmeg

Directions

Preheat the oven to 375F. Cut the stems off the peppers and pull out the seeds. Place on a rimmed baking sheet (covered in parchment paper) and bake for about 40 minutes, turning once. The peppers should be very soft and collapsed. If you are roasted them on the barbecue, place them on the grill whole, and turn them as the skins blacken. Let them cool and sweat in a bowl wrapped tightly with plastic wrap before peeling off the skin and removing any remaining stem and seeds. Roughly chop the peppers.

In a large pot, saute the onion in the oil to 5 to 7 minutes over a medium-high heat, until softened and translucent. Add the garlic and the chilies and saute for another minute or so.

Add the corn, squash and lentils; cook for 3 to 5 minutes, until moisture begins to release from the squash. Add the roasted peppers, vegetable broth and salt. Cover and bring to a boil. Once the soup is boiling, lower the heat and simmer for about 20minutes, covered.

Add the coconut milk and blend the soup, either by using an immersion blender or by slightly cooling and then transferring the soup to a food processor or blender in batches. Reheat the soup and stir in the nutmeg, maple syrup and lime.

Enjoy!

Adapted from Veganomicon by Isa Chandra Moskowitz and Terry Hope Romero

September 6, 2010

Coconut Cake

In the past, when it came to cake, I would usually go for the standards, chocolate, vanilla, or to spice it up, marble! But on one occasion I was looking for something with a little hint of the tropics for a dinner I was making - alas I found this Coconut Cake! It has since become one of my favorites!

As always, I love it because it's so easy and always turns out perfect! And it works really well without any icing, so you save yourself a couple steps there. Instead of icing, I make a really simple lemon glaze and pour it on top of the cake once it cools. The sweet lemony flavour perfectly complements the delicate coconut, and as a bonus, it adds extra moisture to the cake (but it's certainly not necessary). You can serve it just like this, or sometimes, I like to top the slice with some warm blueberry compote - again, pairing perfectly with the coconut and lemon flavours!! All these recipes are included below - mix and match, or even try it with your favourite icing!


Ingredients
1 3/4 cups all-purpose flour
2 1/2 tsp baking powder
1/2 tsp baking soda
3/4 cup unsweetened shredded coconut
1 cup unrefined sugar
1/2 tsp sea salt
1 1/2 cups plain non-dairy milk
1/4 cup unsweetened applesauce
1 tsp vanilla extract
1/4 - 1/2 tsp almond extract (or 1/4 tsp each of almond and coconut extracts)
1 1/2 tsp freshly squeezed lemon juice
1/3 cup canola oil

Directions
- Preheat oven to 350 degrees.
- In large bowl, combine dry ingredients, including coconut, sifting in flour, baking powder, and baking soda, and mix until well combined.
- In a separate bowl, combine non-dairy milk, applesauce, vanilla and almond extracts, lemon juice, and oil.
- Add wet mixture to dry, and stir until well-combined (do not overmix).
- Lightly oil a bundt pan, angel food cake pan, or 2 round cake pans. Pour batter evenly into cake pan(s).
- If using a bundt or angel food cake pan, cook for 35-40 min (until toothpick comes out clean). If using two round cake pans, cook for 23-26 minutes.


Lemon Glaze
3/4 cup powdered sugar
2 tbsp lemon juice

Combine and mix well until there are no lumps. Prick all around cake with long skewer and drizzle glaze over the whole cake.

Warm Blueberry Compote
1 cup frozen or fresh blueberries
1/4 cup maple syrup

Combine in a small saucepan. Gently heat at a medium temperature and mash blueberries as it heats. Bring to a gentle boil and remove from heat. Spoon over slices of cake immediately.

Enjoy!

This cake recipe is from Dreena Burton's Eat, Drink and be Vegan!